NOTE: Developing FUSEE Apps is currently only supported on Windows operating systems.
After a successful FUSEE Installation you might want to create your first FUSEE App in Visual Studio Code.
Create a simple FUSEE App
Create a new empty directory somewhere on your hard-disk. This will contain your first FUSEE App. Name the directory
MyFirstFuseeApp.Open the the directory in Visual Studio Code in one of the following ways.
- Either Open VS Code, click on "File → Open Folder" from the menu and select the
MyFirstFuseeAppdirectory. - Or In Windows Explorer, right-click on the
MyFirstFuseeAppdirectory and select "Open With Code" from the context menu. - Or In a Console (Command Prompt or PowerShell),
cdtoMyFirstFuseeAppand entercode .at the command line.
- Either Open VS Code, click on "File → Open Folder" from the menu and select the
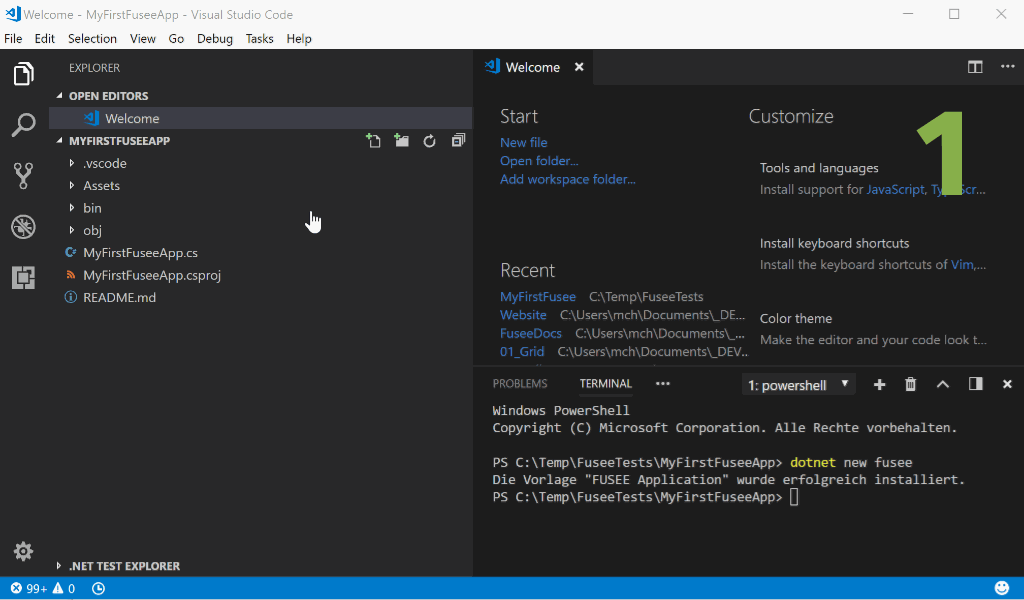
In Visual Studio Code (with the open folder), Open the integrated terminal ("View → Integrated Terminal" from the menu,
Ctrl+`on English keybards,Ctrl+Öon German keyboards).In the terminal window at the lower part of VS Code, enter
dotnet new fusee. This will populate yourMyFirstFuseeAppfolder with all necessary sources, assets and project settings needed to build a simple FUSEE app.
Screen Cast: Create a simple FUSEE App
Build and run the App
In Visual Studio Code, open the Debug Side Bar by clicking on the debug symbol ("No Bugs Roadsign") on the left.
On top of the Debug Side Bar, make sure that the drop-down box next to the green arrow shows
Debug in FUSEE Player. If not, select this option from the drop-down box.Click on the green arrow to build your new FUSEE App and start it in the Debugger. As your new FUSEE App was never built before, the build process might take some time.
As a result, the FUSEE Player application starts and runs the code from your FUSEE application. Try to view the rocket from different angles by clicking and dragging the mouse.
Screen Cast: Build and run the App
If you're curious how your FUSEE App works look at the source code file MyFirstFuseeApp.cs that was generated
in your project directory.
Things to know
Now that you created your first FUSEE App, there are some things to know about the build process.
Console commands
All steps mentioned above are individually available as commands from within Visual Studio Code
as well as from the command line. Make sure to cd to the root directory of your project. In our
example above this would be MyFirstFuseeApp/.
| Build/Publish/Run Step | Visual Studio Code command | Console command line |
|---|---|---|
| Build | Tasks → Run Build Task... → build | dotnet build |
| Publish .FUZ App | Terminal → Run Build Task... | |
| Publish Desktop App | Tasks → Run Build Task... → Publish FUSEE Desktop App | fusee publish -p Desktop |
Publishing as Desktop App
As mentioned in the table above, there is a build step available allowing you to
publish your Desktop App (as .exe file). The result will be written to pub/Desktop.
Publishing as .FUZ App
To create the project as .FUZ, you have to select the build task in Visual Studio Code. Either in the Terminal tab under Run Build Task or with the key combination CTRL-Shift-B. The file is then in the bin folder
Project folder naming rules
When creating new FUSEE Apps in the way described above, several things in your new project will be named after your project folder. Make sure your folder name obeys to the C# identifier rules. Roughly, that means:
- First character may be only letter (
a-z,A-Z) or underscore (_). - All other characters may be letter, underscore or number (
0-9). - Don't start the folder name with a number.
- Don't use punctuation or other special characters in the folder name, not even a minus (
-)!